
- The ‘Working’ Commodore 64/128 Diorama and Raspberry Pi VICE Emulator
- -> Installing the VICE Commodore Emulator for Console Mode on a fresh Raspberry Pi 4
- Mirroring Raspberry Pi HDMI Video to a ST7789 1.3 inch LCD Display
- Patching the VICE emulator to light up floppy drive LEDs
Last Updated on March 17, 2023.
At the time of this writing, there’s no binary package ready to install on the Raspberry Pi 4. Also, I need to make sure I can run the VICE emulator on the console and not in X-Windows for my diorama project. That install isn’t difficult but isn’t a single line or two either, so we’ll start from scratch on a fresh Raspbian lite install. This article assumes some familiarity with how VICE works. Let’s install VICE on a Raspberry Pi 4!
Raspberry Pi 4 Version Log
This document evolves over time – things change and old versions of Raspbian just stop being supported, and we try to make it work with the latest versions. I’ve generally had better luck with Buster compared to Bullseye, but we try to get both up and running.
All of these in records in the table below imply the general settings changes to the VICE config presented later in the document (VICE/PI General Settings I change regardless of version). Also, make sure to check out settings specific to the OS you’re using later in this document!
| OK For Use | Raspberry PI OS Version | VICE Version | Raspi 4B Status PAL | Raspi 4B Status NTSC | Raspi 400 Status PAL | Raspi 400 Status NTSC | Install Script Links |
| Yes | 2023-02-21-raspios-bullseye-armhf-lite.img.xz | 3.5 SVN/ Changelog / Tarball | OK! | OK! | OK! | OK! | GitHub / Raw |
| Yes | 2023-02-21-raspios-buster-armhf-lite.img.xz | 3.5 SVN/ Changelog / Tarball | OK! | OK! | OK! | OK! | GitHub / Raw |
| Yes | 2023-02-21-raspios-bullseye-armhf-lite.img.xz | 3.7.1 SVN / Changelog / Tarball | OK! | OK! | OK! | OK! | GitHub / Raw |
| Yes | 2023-02-21-raspios-buster-armhf-lite.img.xz | 3.7.1 SVN / Changelog / Tarball | OK! | OK! | OK! | OK! | GitHub / Raw |
Simplest way to execute the scripts is to copy the Raw link and on your raspberry pi console /ssh, do this:
wget -O - <raw script url> | bashTest Programs
I’ve also added some test programs I can easily download from my VICE script github. I use these to test very basic SID/graphics functionality. Here are the credits to the great demo makers that made them:
delaytest.d64 – Written by the 8-bit guy – useful for testing lag, and also gives an audio ping each time you press a key. I start here for just the most basic ‘is this thing on?’ approach.
Booze Design – Remains (PAL) – Lovely haunting track. https://csdb.dk/release/?id=187524
SHAPE – Disco Apocalypso (PAL) – Up beat and great visuals. https://csdb.dk/release/?id=133935
Fairlight – 2600 (PAL) – https://csdb.dk/release/?id=197187
Style – Shine On (NTSC) – https://style64.org/release/shine-style – At least some graphics and smooth SID music for NTSC testing
Looking for more demos and such?
http://www.atlantis-prophecy.org/recollection/?load=home
VICE/PI General Settings I change regardless of version
Unless noted here, I don’t change any system settings on my raspberry pi workbench setup, except for enabling Wifi and SSH, everything is is left as the default when Raspberry Pi OS installs.
These seem to be the best general settings for things to play smoothly on the PI. They mostly involve removing the raster line filter and adjusting audio settings.
- Apply these settings in your VICE Config:
- Machine Settings -> Model Settings -> SID Settings:
- SID Model -> 8580 + digi boost (ReSID)
- reSID sampling method -> Fast
- Video Settings -> Size Settings
- Disable double size
- Disable double scan
- Select Fullscreen
- Video Settings -> Render filter
- Select ‘None’
- Sound Settings
- Buffer size 50msec
- Frequency 22050 Hz
- Machine Settings -> Model Settings -> SID Settings:
In C64 VICE Config form (/home/pi/.config/vice/sdl-vicerc, this looks like this:
[C64]
MenuKey=293
MenuKeyUp=273
MenuKeyDown=274
MenuKeyLeft=276
MenuKeyRight=275
MenuKeyPageUp=280
MenuKeyPageDown=281
MenuKeyHome=278
MenuKeyEnd=279
SoundDeviceName="alsa"
SoundSampleRate=22050
SoundBufferSize=50
AspectRatio="1.000000"
VICIIVideoCache=0
VICIIDoubleScan=0
VICIIDoubleSize=0
VICIIFullscreen=1
VICIIFilter=0
SDLStatusbar=1
SidResidSampling=0
SidEngine=1
SidModel=2
ETHERNETCARTBase=56832
Acia1Base=56832
Sometimes, I mess with the sound sample rate when I’m capturing HDMI output and streaming It seems I need to set audio sample rate to 44100 to get my HDMI capture device to grab audio into OBS, but as far as the VICE/PI goes, I heard audio fine through my speakers. (SoundSampleRate=44100)
If you need to change your sample rate if you’re capturing output, you can try the various options in here: (Menu or config file)
- Sound Settings ->
- Frequency 44100 Hz
This generally sets a config file line:
SoundSampleRate=44100
VICE/PI Version specific settings I’ve changed
2023-02-21-raspios-buster-armhf-lite.img.xz / VICE specifics
Synopsis: Apply general settings and you’re good to go.
Raw Notes: After applying recommended generic settings, test programs ran fine (Before that, no so much). I was locked in at 100%/50fps using x64 and PAL/NTSC using the x64 binary. The x64sc binary still chews more CPU and runs slightly slower (naturally). I still recommend applying the generic settings I use though, since I had issues with NTSC (read on…)
However, on NTSC, I do notice the CPU/FPS drop from 100% to 80%, jump back up again. This was before applying my general settings. Once I applied those, everything worked well, no stutters or CPU drops.
2023-02-21-raspios-bullseye-armhf-lite.img.xz / VICE specifics
Synopsis: Apply general settings and change to fkms video driver, and then choose HDMI output in raspi-config.
Raw Notes: After executing the script and applying the generic settings, I noticed the strange 100% to 80% CPU drops go away. This has to be something with the audio layer, imho. Now, I just wasn’t getting audio (maybe on headphones on the 4B, but the 400 doesn’t have a headphone jack)
When I switched default audio to HDMI 0 in raspi-config, that broke ALSA in vice (error message), but I also noticed even when playing demos, the CPU was locked at 100%. Something with the sound layers… I’ve tried changing to SDL and I get no audio at all (I’m only in console mode, remember)
So, next, I tried the no longer supported but still available fkms overlay setting in /boot/config.txt. After setting that and rebooting, I was able to select HDMI in raspi-config and I got audio. So far, so good. I’m not happy about having to use fkms still for bullseye, but it at least got it working.
So, for me to get this working on Bullseye, I make the following changes:
- Make the general settings changes to sound/display in my general settings section (this is a must)
- Bring in fkms driver for HDMI audio:
Edit your /boot/config.txt and change the following:
BEFORE:
# Enable DRM VC4 V3D driver
dtoverlay=vc4-kms-v3d
AFTER:
# Enable DRM VC4 V3D driver
dtoverlay=vc4-fkms-v3d
You must reboot after /boot/config.txt changes. You must also go into raspi-config and choose your audio device (this is how I was able to get VICE HDMI Audio on the 400)
Side note: I had flashing video artifacts on bullseye, but only when I was going through a USB HDMI capture device. Direct HDMI worked fine. Not sure why video is flashing so much when not going through the USB HDMI capture device on bullseye when it didn’t happen on buster at all. I’ve got another HDMI capture device I might use to see if it’s something specific with the flasher. Is there some refresh rate configuration difference between buster and bullseye? Same hardware, same firmware, just different OS versions and vice dependencies.
The rest of the document is a bit of a ramble since these versions change all the time but it covers the high level.
To that end, given all the changes that constantly happen in VICE, PI, and such, the video below is no longer 100% accurate. It still covers the general setup tasks, but the script is the source of truth as versions and methods change over time.
Hardware before the Software
This part is pretty simple – you’ll need:
- Raspberry Pi 4 Model B, or Raspberry Pi 3B+
- Micro SD Card (we’re generally at the days of 16GB or higher)
- Micro HDMI cable (or full HDMI if you’re using a Raspberry Pi 3B+)
- Keyboard / Mouse for initial setup, Wifi connectivity for later SSH connectivity.
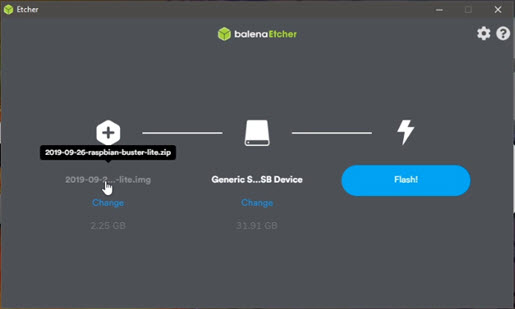
Write The Raspberry Pi 4 Image
We’ll start with a fresh SD Card and a Raspberry Pi 4. We’re going to burn Raspberry Pi OS Lite (I’m not using a window environment) on to the SD Card using Balena Etcher.
Boot the Raspberry Pi and get connected.
We know our default password is raspberry and our default user name is pi. You should change these if you’re going to keep this install around. Regardless, we need to set just a couple of things before we start with VICE – such as my desire for SSH access so I could copy/paste commands more easily. Here are those steps after you give yourself a good old fashioned sudo raspi-config:
- Set hostname to vice-pi-install (This makes it unique and through bonjour lets me access it from my Windows PC as vice-pi-install.local.)
- Set WIFI up to my access point (Country Code and SSID)
- Allow SPI interface access (my diorama is going to be controlling an LCD through SPI) – This is purely optional – I used it because I’m hooking up some custom circuits to my Pi.
- Allow SSH interface access (so we can copy/paste from a Windows SSH client) – Optional if you just want to type all the commands directly to your Pi console.
- Setup locale, keyboard, etc.
- Verify Internet Connectivity (ping google.com)
- Perform your normal
apt update / apt upgradecommands to update your system.
sudo apt update
sudo apt upgrade
Download and execute the install script
I’ve created a few scripts for various versions to do all this work on a Pi Install. Check the table at the very start of this document for matching scripts to install based on your PI or VICE or PI OS version (Yeah, it can be that twitchy). Download the script you want, chmod +x the script, and run it. Look it over yourself if you’re concerned about just running some guy’s script.
You can execute your script directly by doing this if you don’t feel like downloading it, chmod-ing it, and executing it manually:
wget -O - https://raw.githubusercontent.com/erkrystof/vice/master/<insertscriptnamehere>.sh | bashWhat the script does at a high level:
- Performs the general sudo apt update/upgrade
- Downloads SDL from libsdl.org
- Compiles and installs SDL and other SDL libraries
- Downloads VICE compilation dependencies
- Downloads VICE source code from sourceforge.net
- Configures VICE to enable fast-sid options and the x64 ‘old’ binary build (as well as the new binary x64sc)
- Installs VICE into your home directory (/home/pi/vice-<version-number>) – Because I dislike /usr/local for vice.
- Binaries will be in the bin directory of where we installed VICE. You’d generally run x64 for the ‘older’ but smoother for PAL Demos binary, or the x64sc (technically more accurate, but uses more CPU and causes PIs to stutter in demos)
The latest version of the script will always be at the link above. It’s configured so if it runs into any error, it aborts.
Why compile SDL on the Pi?
We used to have to do this from a fork from Retropie, and in previous cases before that I could just install the sdl libraries and use those. However, I’ve found that every time I try to do that with the latest versions of Raspi-OS and VICE, I end up getting an SDL related error trying to draw the screen when launching from the console – so for now, I compile the SDL libraries on the Pi and things seem to work. In previous versions of Buster, I couldn’t get this to work from SDL directly, I had to use RetroPie’s fork and manipulations on some videocore headers. I no longer need to do that for what I’m assuming are changes in the OS version over the past couple of years.
We will build SDL2-2.0.14 from RetroPie’s fork that has Raspberry Pi specific modifications. Part of the compilation below is from RetroPie’s SDL 2.0 install script. To learn more about the excellent RetroPie project, head on over to their site here. I’ve made a fork off that repo and that’s where I’m pulling from in my script – it’s just in case I need to make any tweaks.
Apply generic settings for sound/video options in VICE.
See the VICE/PI General Settings I change regardless of version section for that. Also, if you’re in Bullseye, there are some specific tweaks in the Bullseye section to apply.
Download a demo and see it perform horribly or wonderfully?
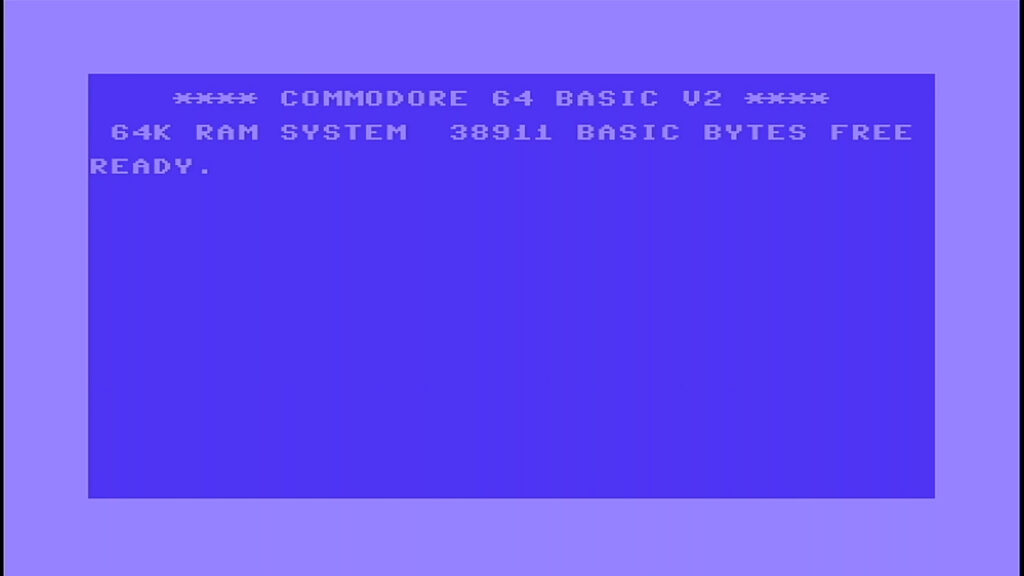
I downloaded a simple demo from csdb.dk by Booze Design known as ‘The Elder Scrollers‘. Downloaded the .D64 file and uploaded that to the VICE Pi. Moving into the /home/pi/viceinstall/bin directory, I typed ./x64 and was greeted with an old blue friend:
Now, depending on how this all comes together, you might have a really tiny C64 screen in the corner of your big monitor. Simply hit F12, scroll down to Video Settings -> Screen Settings -> Fullscreen.
Noticing stuttering and other issues? Look at the settings in the top part of the document that I apply generically as well as for certain OS/VICE combinations and try those.
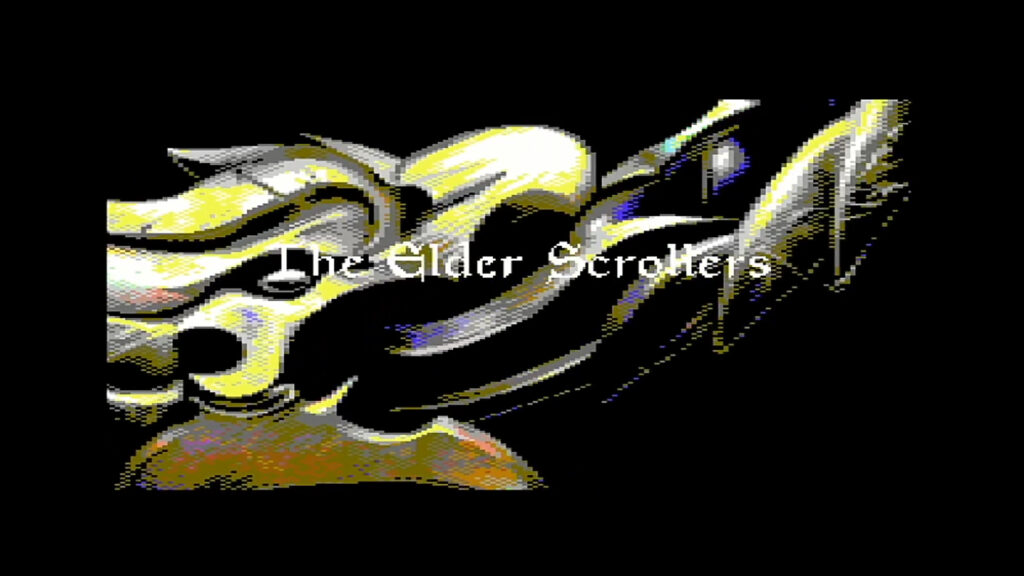
Apply settings and watch a demo perform smoothly
Finally, after modifying my settings, restarting VICE, and after autostarting the demo image I downloaded, I was able to sit back and enjoy classic SID sound from the Elder Scrollers demo:
With that, we finish the install of VICE on a Raspberry Pi 4 in console mode as the foundation of my Diorama 64 project. Any thoughts or concerns, things that didn’t work well for you with your install? Leave a comment down below or join the discord at https://discord.gg/wbngTy8 and we can chat. Next up: the Raspberry Pi 4 and the LCD display turned monitor.
Raspberry Pi 3B+ Instructions
** May not work, I have NOT updated this yet for VICE 3.6.1 **
Generally, the build is very similar. I’m going to skip all the discussion points and run down what I think seems to work on a Raspberry Pi 3B. The key differences are how we build SDL. I didn’t seem to need to change any graphic related driver setting to get this to work.
sudo apt update
sudo apt upgrade

#SDL for Raspi-3B dependencies
sudo apt-get install libfontconfig-dev qt5-default automake mercurial \
 libtool libfreeimage-dev libopenal-dev libpango1.0-dev libsndfile-dev \
 libudev-dev libtiff5-dev libwebp-dev libasound2-dev libaudio-dev \
 libxrandr-dev libxcursor-dev libxi-dev libxinerama-dev libxss-dev \
 libesd0-dev freeglut3-dev libmodplug-dev libsmpeg-dev libjpeg-dev

mkdir ~/sdlwork
cd ~/sdlwork

hg clone http://hg.libsdl.org/SDL
cd SDL

./autogen.sh
./configure --disable-pulseaudio --disable-esd --disable-video-mir --disable-video-wayland \
 --disable-video-opengl --host=arm-raspberry-linux-gnueabihf
make
sudo make install

cd ~/sdlwork

wget http://www.libsdl.org/projects/SDL_image/release/SDL2_image-2.0.5.tar.gz
wget http://www.libsdl.org/projects/SDL_mixer/release/SDL2_mixer-2.0.4.tar.gz
wget http://www.libsdl.org/projects/SDL_net/release/SDL2_net-2.0.1.tar.gz
wget http://www.libsdl.org/projects/SDL_ttf/release/SDL2_ttf-2.0.15.tar.gz

tar zxvf SDL2_image-2.0.5.tar.gz
tar zxvf SDL2_mixer-2.0.4.tar.gz
tar zxvf SDL2_net-2.0.1.tar.gz
tar zxvf SDL2_ttf-2.0.15.tar.gz

cd SDL2_image-2.0.5
./autogen.sh
./configure
make
sudo make install
cd ..

cd SDL2_mixer-2.0.4
./autogen.sh
./configure
make
sudo make install
cd ..

cd SDL2_net-2.0.1
./autogen.sh
./configure
make
sudo make install
cd ..

#Interestingly enough TTF builds just fine on the 3B.

cd SDL2_ttf-2.0.15
./autogen.sh
./configure
make
sudo make install
cd ..

#Now, on to VICE for the Raspi 3B

sudo apt install libmpg123-dev libpng-dev zlib1g-dev libasound2-dev libvorbis-dev libflac-dev \
 libpcap-dev automake bison flex subversion libjpeg-dev portaudio19-dev texinfo xa65

mkdir ~/vicework
cd ~/vicework

#3.4 is the latest VICE release
svn checkout svn://svn.code.sf.net/p/vice-emu/code/tags/v3.4/

cd ./v3.4/vice
./autogen.sh
./configure --prefix=/home/pi/viceinstall --enable-sdlui2 --without-oss --enable-ethernet \
 --disable-catweasel --without-pulse
make -j $(nproc)

# I got an error here for the running of make install - you may or may not need to do the sudo.
sudo make install

#after this point, I went directly to the vice install directory and ran it
cd ~/viceinstall/bin
./x64sc
References:
- Balena Etcher
- Enabling Bonjour for your Raspberry Pi
- VICE Homepage
- Lemon 64 Thread on Custom SDL Build
- SDL on Raspi (for 3B compile)
- Compiling SDL2 from source
- x64 vs x64sc VICE binaries
- The Elder Scrollers Demo
Thank you for providing your guide. A couple of differences for my setup:
1). A Pi 3B+
2). Using the 7″ LCD
After following your guide and trying to launch x64sc, I get the SDL error that there is no available video device and that archdep_init failed.
I’m certain I followed your guide as I’m not a linux noob, so could these issues be related to the HW differences?
Hi Bill! Good question. I did *not* try this on a 3B+ yet. I do have one available though, let me run through it and see if I can update the article and respond back to you with my results.
Also – what LCD display is that – an HDMI display? Is it your primary?
Bill, looks like I figured a way to make this work – I created another section at the end of this article for the Raspberry Pi 3B+. Give it a shot and let me know if that works. I just tried it on a 3B+ and was able to get the C64 ready screen up. I didn’t do much testing beyond that.
Hi, thanks for this guide 🙂
I’ve tried to build vice on Raspbian Buster Lite.
i followed your instruction and tried to build on my Rasp 3B and on Rasp 4B the vice emulator.
Everything goes well, except it stops in the final make with aseries of “undefined reference” error:
make[3]: [Makefile:1862: c1541] error 1
make [2]: [Makefile:2008; all-recursive] error 1
make[1]: [Makefile:1763: all-recursive] error 2
make: [Makefile:506: all-recursive] error 1
Can you point me out what’s wrong?
Thanks,
Giuseppe
Giuseppe,
I’ve not seen that error – it’s possible something has been updated, either the VICE source code or something in Raspbian that’s changed.
When I get some time this weekend I’ll try rebuilding VICE on a fresh Pi 4B and see if I can reproduce the error!
Cheers,
Krystof
Thank you very much for your answer, yeah, i think too something has changed in the vice source 🙁
All the problems seem to come from “linenoise” lib.
If you have time and wish to recompile it, it will be fantastic 🙂
I really want to have a Vice Emu for my 3B and 4B.
Thanks once again,
Giuseppe
Giuseppe,
So far it’s been a bit ugly in two ways:
1. I can’t reproduce the error you’re seeing.
2. I can’t get a fresh install to work any longer.
So… I’m back trying to get it working again, perhaps through that work I’ll run into your issue!
Thank you for your reply Eric 🙂
If you can make it compile again, please update your post 🙂
Cheers,
Giuseppe
I was finally able to get a fresh recent install working, and it’s a bit of change to how SDL is utilized (I end up using RetroPie’s source)
I need to reformat the Pi again and start from scratch to make sure it’s a repeatable process. Once that’s done, in the next day or so, I’ll send an update out.
To that end, can you tell me if there’s anything unique to your Pi setup that you do or install? It might help me reproduce since even with all the changes I’ve made in the last few days, I still never saw the compile issue. Any software you also installed or other configuration tweaks you made?
Cheers,
Eric
Hi Eric,
glad you was able to compile it 🙂
I didn’t install anything else than just a fresh copy of Raspbian buster lite, then followed your instructions.
Everything worked well, every SDL2 lib compilation, Vice configuration worked too without any problem, only when i launched the command “Make” , after awhile it failed with the error i mentioned some day ago. the error seemed to refer to libLinenoise.
Please, when you have time and if you want, update your guides, they helped me very much 🙂
Cheers,
Giuseppe
Well, Giuseppe, I’ve updated the guide as best as I could. Feel free to give it a shot and see how it goes. The primary differences are going to be how SDL is compiled and installed (along with *not* rebuilding SDL-image and SLD-ttf), along with building VICE directly from the 3.4 tag instead of trunk. I hope it works for you! I’ve tried this on a 4 and 3B.
If that breaks in the same spot, see if maybe there’s a way you can turn up logging or debug (I’m not sure), perhaps there’s something more useful we can use to determine what’s going on.
Thank you very much for your work Eric 🙂
Yesterday i tried to compile SDL2 with your new guide, unfortunately i got some error :(( ( No luck at all)))
When i typed:
sed -i ‘s/libgl1-mesa-dev,/libgl1-mesa-dev, ‘”${conf_depends[*]}”‘/’ ./debian/control
I got error param s is not recognized…
Didn’t have any luck, anyway, i’ll try again, maybe i misprinted something 🙂
Thanks once again 🙂
Giuseppe
Hi Giuseppe,
It might help to copy that and paste it – if you’re typing it manually that could easily be a typo there. If you *did* copy and paste that, I may have an error on my end! 🙁
What I will do this weekend, which I should have a while back, is turn this into a script you can run. If I do that, I’ll update again and send you a link.
After many, many failures I finally was able to compile VICE for console on a RPi 3B. Thanks a lot for this tutorial! Great work!
Thank you very much, I’m glad it has worked out for you!
After running PKG_CONFIG_PATH= dpkg-buildpackage -b
I get the following errors (on Pi 4) 🙁
make[1]: *** [debian/rules:28: override_dh_auto_configure] Error 2
make[1]: Leaving directory ‘/home/pi/sdl-work/SDL-mirror’
make: *** [debian/rules:25: build] Error 2
dpkg-buildpackage: error: debian/rules build subprocess returned exit status 2
I wish Vice was straight forward to install, the Pi is such a great platform for C64 emulation.
Hi Ben, I share the same wishes. 🙂
Things change so often with libraries and system updates, I have a Raspi 4 I keep for nothing but build testing. So I’ll try and fire that up and do a fresh reinstall and recreate the issue. That whole dpkg-buildpackage bit was absolutely horrible to work through and document – that’s the first time I couldn’t just download source, build the custom library and utilize it in a straightforward fashion. The older method I had worked a bit better that way but later crapped out with the last raspberry pi buster update…. So I had to find an alternative working mechanism and landed on RetroPie’s solution.
Given that any of the above components, libraries, os, and retropie, can change independently, it’s going to be a never-ending struggle. So I’ll start from a fresh install and execute my grouping of commands on this page and see if I run into the same issue as you did.
I did get it working using libsdl2-dev instead of the compiled special version, which is brilliant! It’s very hmmm “interesting” compared to the Windows version which is comparatively simple to configure. I haven’t figured out how to get a gamepad to work. Also having a lot of “Sound: Warning – Buffer drained” although I’ve increased the buffer to 150ms and changed from reSID to sid Fast.
Ok the gamepad works after some further tinkering. Thanks for your hard work putting this all together.
Excellent, and you’re welcome!
That’s great to hear – the libsdl2-dev might have been updated some since I last tried it. Would you mind pointing me to the repo you pulled it from so I can try that out instead? I’ve not tried a gamepad on vice myself, but I have done a regular 9 pin joystick with a USB converter and that did work as a joystick.
The sound buffer drain error is something I also get – I’ve generally been ignoring it and in general I’ve not had many sound issues in the games I play – but some of the demoscene eye-candy I’ve tried do require some SID setting changes now and then.
It was just the standard old “apt install libsdl2-dev” that seemed to do the trick.
I’ve just tried the “PiKiss” script with a fresh image and that seemed to work really well too (PiKiss script link below). There were some differences in the dependencies which you may find interesting:-
Same in both: subversion flex bison xa65 texinfo libasound2-dev
Unique to Jose: libsdl2-dev (as we know) autoconf libglew-dev libieee1284-3-dev (parallel port why??)
Unique to Krystof: libmpg123-dev libpng-dev zlib1g-dev libasound2-dev libvorbis-dev libflac-dev
libpcap-dev automake libjpeg-dev portaudio19-dev
This script… https://github.com/jmcerrejon/PiKISS/blob/master/scripts/emus/commodore.sh
Beautiful, Ben. Thank you so much. This will definitely help me get some updates going for the install instructions.
Hi Eric,
I deeply appreciate that you are making this guide for compiling vice. Is there any news on when do you plan to provide an update to the instructions? Well, I have a Pi 3B and I added some wiringpi lines to vice source in order to emulate the drive led status into an actual led connected to the gpio. It was shown in on Perifractic’s Retro Recipies channel on Youtube. I contacted the author of this Idea and he gave me some guidelines on how to make this to work.
The only os that worked with compilation was combian. Of course, I wanted to do the compilation on a fresh raspberry os lite so i followed your instructions from above and I have the following error coming up while compiling:

Any ideas what is the problem? Maybe you could update your instructions for the rpi 3B in relation to the latest raspberry os version?
Thank you in advance
Hi Michal,
Thanks for the note. I’ve not done the build on the 3B in a while, so I can validate that with the latest raspberry OS version. However, while I half-expect it to work on my machine without issue, it still may not on yours, given your error. Sounds like, based on that picture, your compilation on combian is acting differently than your compilation on raspbian. If combian worked then it’s most likely ignoring your implicit function declaration.
Off the top of my head I think there’s two ways around your problem:
In my case, I decided to declare mine when I was creating my mini 1541 LED Drive in my diorama, if you’ve not seen that article it might help:
https://krystof.io/patching-the-vice-emulator-to-light-up-floppy-drive-leds/
Thanks for the feedback. Please, validate the installation with 3b and latest raspberry os lite. I would appreciate a small tutorial.
Thank you in advance
Hi Krystof,
I’ve tried the procedure for Raspberry Pi 4 with the new Vice 3.5 and unfortunately it’s broken. If you have time and wish, please update your guide for the new Vice.
Cheers,
Giuseppe
I’m going to work on that this holiday weekend! Happy New Year!
Hi Krystof,
Any news on compiling Vice 3.5?
I wish there was, Giuseppe. I really do. I’ve been working days and nights for work for the last few months now, I wish I could say that had signs of slowing down but I’m not feeling optimistic about it. This is *the thing* I want to work on in spare time. I’ll update this page when I have something. 🙁
No pressure :))),
It’s ok and right that way :), i mean, in a period like this, it’s a luck to have a regular job :))
Have a nice day 🙂
Giuseppe
You too, Giuseppe. I’m going to try and dedicate Sunday morning to this in a live stream on Twitch (It’s a workshop stream, so it will be me trying to figure it out, since I don’t know how to do it myself yet). I should be able to get some movement on it. 🙂
Hey Giuseppe what are the advantages of 3.5 you want to see?
Hi Ben,
Thanks for your reply and procedure to compile Vice 3.5 on Raspberry Pi.
I’m very curious to try the lower input user latency and a 50hz scrolling 🙂
I will try as soon as possible.
Thanks once again.
Giuseppe
I’ve updated this post, Giuseppe, see if that works for you, and good luck!
sudo apt-get install flex bison xa65 libgtk2.0-dev texinfo libxxf86vm-dev dos2unix libpulse-dev libasound2-dev
sudo apt-get install texlive-latex-base texlive-fonts-recommended texlive-fonts-extra texlive-latex-extra
download this to your Downloads folder – http://libsdl.org/download-2.0.php Download SDL2-2.0.14.tar.gz – GPG signed
cd ~
tar xvfz ~/Downloads/SDL2-2.0.14.tar.gz
cd SDL2-2.0.14
./configure
make
sudo make install
download this to your Downloads folder – https://www.libsdl.org/projects/SDL_image/ Download SDL2_image-2.0.5.tar.gz
cd ~
tar xvfz ~/Downloads/SDL2_image-2.0.5.tar.gz
cd SDL2_image-2.0.5
./configure
make
sudo make install
download this to your Downloads folder – https://vice-emu.sourceforge.io/ Download tarball: vice-3.5.tar.gz
cd ~
tar xvfz ~/Downloads/vice-3.5.tar.gz
cd vice-3.5
./configure
make
sudo make install
Now the executables will be found here; usr/local/bin
Beautiful. I’ll start with this when I stream the workshop tomorrow, thanks, Ben!
Seems to be a fair bit of slow down and haven’t had a chance to figure it out yet. How do I watch the stream what’s your twitch name?
https://www.twitch.tv/mrkrystof is the link, sir. I’ll be on about 7am Sunday morning, CST / -6 GMT.
Credit to Dave for my copy paste above. https://techwithdave.davevw.com/2021/01/
Thanks, Ben, and thanks for hanging out a bit on the stream today. I’ve updated the guide and was able to get it running in console mode and get around some really bad audio stuttering.
Excellent guide! I have it working and the suggested settings make all the difference.
I’ve added a line to RC.local to make it start on boot. USB gamepad working with zero issues.
So happy to hear that, sir. I’m glad to hear you’re reporting success with gamepads as well!
Happy holidays to everyone 🙂
It’s now time to compile Vice 3.6, who knows if the described procedure works with this new release….l’ve to try :))
Happy Holidays, Giuseppe! Yes indeed – versions go up, and the guides become out of date – It never ends! 😀 I’ll have to give it a shot and see if it works out. Having to do the separate SDL library stuff has always been the bummer – plus with the latest version of Raspbian – who knows how this will play out. I’ll try as well and we’ll see what happens!
Hi Eric 🙂
Unfortunately i had no luck in compiling Vice 3.6, did you try?
Cheers,
Giuseppe
I have not yet, Giuseppe, but I’ll give it a shot this weekend or sooner and see. Always upgrading… 😀
Hi Eric,
It’s been a long time already :))
I’ve been trying to build Vice 3.6 but keep failing with compilation :/ I wonder if you tried and had success :))
Cheers,
Giuseppe
Giuseppe,
It has been a long time, and I unfortunately didn’t get to it. However, what I did do this last week is clean my entire basement and open up boxes I’ve not touched since I moved my all my stuff down to the basement. So the workbench is actually clean again, I found my testing raspberry pi and had you in mind as I was getting things all together. So while I haven’t tried it yet, I am going to give it a shot this weekend and see if I can make progress!
Giuseppe, I’ve got a beta version of 3.6 scripting done – this is for BULLSEYE and not Buster. Looks like I can just install default sdl2 libraries instead of having to compile our own, so that was removed. I was able to run this, compile, and install, and ran one simple demo. Let me know how this works out for you. I still followed my previous VICE settings after the install, fyi.
https://github.com/erkrystof/vice/blob/master/install-vice-3.6-bullseye-raspi-4.sh
If you’re using Bullseye, this may not work – I decided to try it with the latest OS and VICE to see, hence Bullseye and not Buster.
Oddly enough – Bullseye Light seemed to stop HDMI audio from working with stock install. Not sure why, but 3.5mm audio did work.
I don’t believe I ever saw the compile error you were seeing, so if you are still having issues, let’s see some error details from your end.
Hi Eric,
Fantastic!! I’m glad :)) This weekend I will try once again, maybe I did something wrong last time i tried.
Thank you very much, I keep you updated.
Cheers,
Giuseppe
Good luck, Giuseppe!
Please note in the meantime I updated the entire article to reference BUSTER instead of Bullseye (the bullseye script I linked still exists, but I prefer Buster for the HDMI output, Bullseye, as of this writing, seems to be rougher to run VICE with for me)
So make sure you use the buster script linked in the main article for VICE 3.6.1.
Hi Eric and happy new year :)))
It became a tradition to make a new build 😀
To be honest, I still didn’t try to compile the new Vice 3.7 on Raspberry Pi OS Lite, I’ll try for sure :))
In these days I’m facing a new challenge :D, running Dosbox-x compiled against SDL2 and running on Raspberry Pi Os Lite. I’m going crazy, it compiles but then get error about video driver.
I know it’s out of scope 😀 but, if you have time and wish, could you make some attempt to build it? If you’d find a solution I’d be super happy 😀
Cheers,
Giuseppe
Giuseppe, always working on PI builds, arent you? 😀 I have not tried DOSBOX-X on the Pi since my games I use DOSBOX-X for really need something faster than the Pi can typically handle (Ultima Underworld is an example). So I don’t know that I’d get to DOSBOX-X on the Pi anytime soon. Maybe it runs better now than the last time I tried, but I’m pretty sure I remember UW not working that well so I just stopped my DOSBOX Pi work and went to a beefier Intel based machine. Good luck on that adventure!
I managed to get this working on a Raspberry Pi400 using Raspberry Pi OS Lite x64 from 2022-09-22.
Audio didn’t work at first, but after running the following three lines it worked perfectly:
sudo apt-get update -y –allow-releaseinfo-change
sudo apt-get install -y libgtk2.0-dev
sudo apt-get reinstall -y pulseaudio
Corneleous Worthington pointed this out on a different page (https://techwithdave.davevw.com/2021/01/how-to-build-vice-35-x64sc-etc-on.html)
BTW, this requires a reboot…
After that, set the audio from ALSA to SDL (I can imagine that it’s possible to configure this in the script, btw.)
Thank you, Bart! I’ll take this into account as I wipe my workbench PIs and try the latest VICE/Raspbian versions.
Curious, Bart – buster or bullseye, lite or desktop? I tried this and I couldn’t even access sound settings in bullseye 02-21 release anymore in raspi-config. It was very odd.
After a few restarts, it shows an error, that sld cannot be initialised for sound.
What’s your OS release/version and VICE version setup? I’ve not been able to reproduce this yet.
Hi Eric
I really like your guide. I originally used your other guide. But this new guide is easier. I managed to install it on the latest version Raspberry Pi OS Debian version: 11 (bullseye). To make it work it took me a while as the audio was being output via the 3.5 mm audio jack. The first thing you have to do once you’ve set your username password is fire up raspi-config and change the audio output to HDMI-0 or HDMI-1. I also change the the HDMI resolution in the config.txt to hdmi_group=2 and hdmi_mode=31. This sets the resolution to 1080p at 50hz. Then I rebooted the Raspberry Pi 4. After reboot I fired up raspi-config again and went to the audio setting and a new device will appear for audio you need to select that one and exit the raspi-config. Then tested the audio out on the command line and it was outputting via HDMI. I then proceed to follow your guide, but with a slight modification I first sudo downloaded your install script and then changed permission on the script then sudo executed it. Once your script finished I ran the C64 emulator and it work with audio without any problems. The horizontal scrolling was perfect as well.
Thanks, Urmil – I’ll be taking these next few days to work on any updates incorporating reader comments and seeing how well they work (I’ve not tired VICE 3.7 yet myself, or whatever latest versions there are of Raspbian). Thank you for your hints and tips here, especially with Bullseye.
Urmil – I’m curious – I didn’t see the ‘new device’ in raspi-config – are you using the desktop OS and are you talking about the UI? I’m doing this install in console mode on the lite desktop, so I didn’t see any new device – I only ever saw three in the audio settings: Headphones, HDMI 0, and HDMI 1.
Hi Eric,
Nicely done!
Just one issue though, for me…
Successful compile/install on Raspberry Pi 400 – I run ./x64 and get this error:
SDL error: No available video device
archdep_init failed.
I am utterly stumped by this.
Any suggestions?
Cheers
Martin
Martin, I’m going to do some bench tests with a 400 and a regular 4 Pi B with the latest stuff here and see how things perform/work with the script. It always needs dusting off here and there. Will update the post with my findings/adjustments!
I should not reply to myself…
Martin, was this on the lite OS install? What release – buster or bullseye? I am unable to reproduce this as of yet and just re-ran the scripts for the 400 on buster. Bullseye still worked, though it seems to have numerous issues of its own.
[…] with RetroPieRetro Gaming with Raspberry PiHow to Build Vice 3.5 (x64sc, etc.) on Raspberry Pi 400Installing the VICE Commodore Emulator for Raspberry Pi 400How to Install KDE Plasma on Raspberry Pi – Linux HintInstalling Network Manager on Raspbian […]