Last Updated on July 11, 2020.
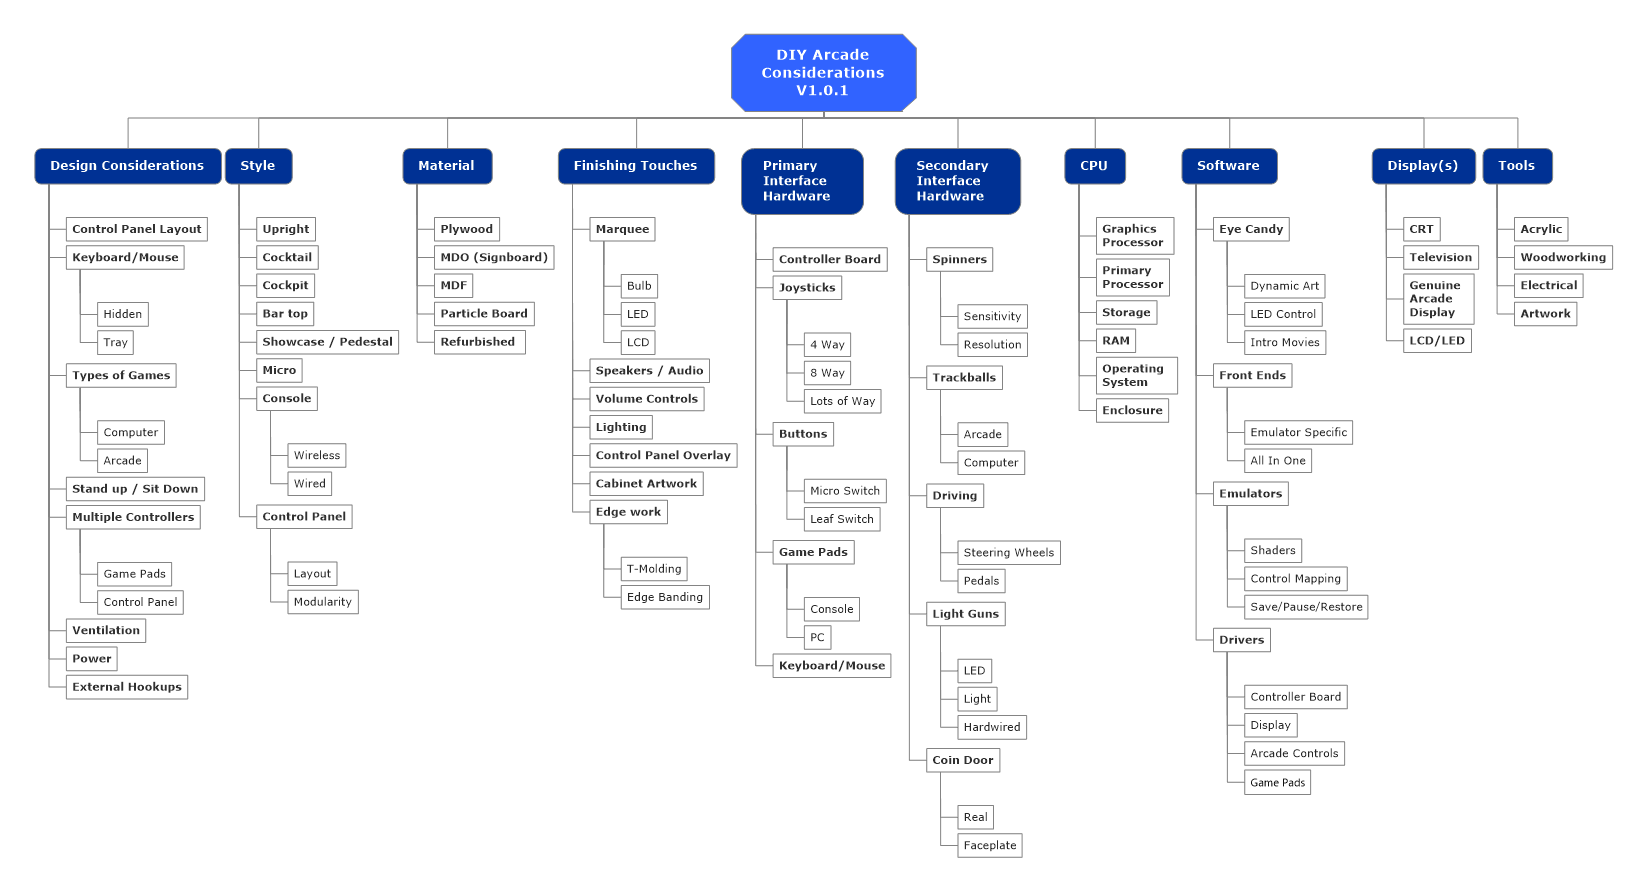
I’ve built one bar top unit so far, and am planning on starting a couple other DIY arcade projects. To get myself ready, I started creating a mind map of things I wanted to consider for an arcade solution based on research I’ve done. That mind map is posted above and available as a file here.
It’s not meant to scare you with the large amount of even high level topics. It’s to get you thinking of what you want to do with a DIY arcade project.
Last Updated 3/21/2016
This space will be built up over time, focusing on each major topic line. Each section will contain links, quotes, and personal observations for each piece.
Table of Contents
- Design Considerations
- Style
- Material
- Finishing Touches
- Primary Interface Hardware
- Secondary Interface Hardware
- CPU
- Software
- Display(s)
- Tools
- References and Further Reading
- Changelog
Design Considerations
- Control Panel Layout – I’d argue this is the most important aspect to your retro gaming cabinet. If the buttons aren’t comfortable to play, be it because they’re at odd angles or too far apart, the games won’t be fun to play, or you’ll fatigue even more easily. Are you building a one player cabinet? Designing for the future and adding four joysticks? Don’t put that trackball right in front of you buttons, you’ll hit them every time you push it. Think of those types of things, and remember – if you do any angled controls for something like four players – don’t angle the joystick movement, leave it pointing directly towards the front. The angled player’s brains will adjust more easily, as counter-intuitive as it might be.
- Keyboard/Mouse – You’ll probably need one for the initial setup and work, so perhaps your embedded guts will have a Wi-Fi keyboard/mouse dongle for any updates or tweaks to the system (or perhaps you remote into it with something like VNC or Teamviewer). Either way, keep in mind that if you play arcade games, your upright cabinet may not be all that grand for PC gaming with certain genres. I wouldn’t want to play Baldur’s Gate, a popular PC RPG, standing up. So, maybe you make the height enough to sit at your arcade if necessary, and with the room you built into your design for a mouse and keyboard, you can play a more ‘sit-down comfortably’ type of game. The other road is to not have those types of games in your cabinet, and keep the cabinet for action instead of tweaking a dump-stat.
- Types Of Games – Keyboard and mouse aside, what games will your arcade be used for? Light guns and shooters? Spinners for Arkanoid and Tempest? Think of the games you want to play and make sure you include (or exclude) the parts necessary to maximize your enjoyment. It may lead to making a modular control panel, or it may lead to a completely different cabinet for different games all together, such as a dedicated Pinball cabinet.
- Stand up / Sit Down – In the Arcade, you generally stood up to play – or you were in a cockpit game attempting to destroy the Death Star or racing down San Francisco streets like Bullitt. Think about how long you’ll be at this machine, or if your players would prefer something they could sit at overtime, perhaps think of adjustable height chairs if they prefer to sit while you stand. It can change your entire layout based on whether you’re leaning into Joust or couch potato-ing your way through Contra. Of course, if you build a ‘console’ style, you’ll most likely be sitting anyhow.
- Multiple Controllers – You could, conceivably, have a whole control panel for playing some games, and a few wireless X-Box controllers for when you want to just relax on the couch and relive Metroid. Conceivably, it’s possible, if your display is big enough to see from your seat but not too large you can’t immerse yourself standing up. Probably not a bad idea to prototype the software side of this first – you may even need separate configurations for swapping between your ‘end-all-be-all’ of cabinet control.
- Ventilation – You may not be thinking of it now, but you need to think of it before you cut your first piece of wood. What guts are you embedding inside your arcade skeleton? Are you going to have enough air flow? Are you going to have dust issues? Consider some quiet PC Fans to help move the air behind the screen up and out, because things can get cramped in there depending on what you’re building.
- Power – Make room for a surge protector inside your cabinet. Chances are you’ll be plugging in more than just a PC, you could easily require a USB hub for controller cards or game pads, extra plugs for display(s), a space and plug for the external hard drive you’re using, or even separate power supplies for LED Control. If you’re hooking the ‘big woofer’ into your system, handle your audio needs as well.
- External hookups – When I built my Father’s Tardis theme arcade, I also wired in a splitter in the back of the cabinet so if he didn’t want to listen to the embedded speakers, he could plugin a headset and control volume separately. Perhaps you want to have part of your USB hub connections available for external hookup? If you’re building a console, you’ll definitely need external connection support, but you may like to have it on a dedicated cabinet as well.
Style
Coming soon.
Material
Coming soon.
Finishing Touches
Coming soon.
Primary Interface Hardware
Coming soon.
Secondary Interface Hardware
Coming soon.
CPU
Coming soon.
Software
Coming soon.
Displays
Coming soon.
Tools
Coming soon.
References and Further Reading
Design Consideration Links
Change log
3/21/2016
Initial Design Considerations Added
3/19/2016
Initial structure created.
